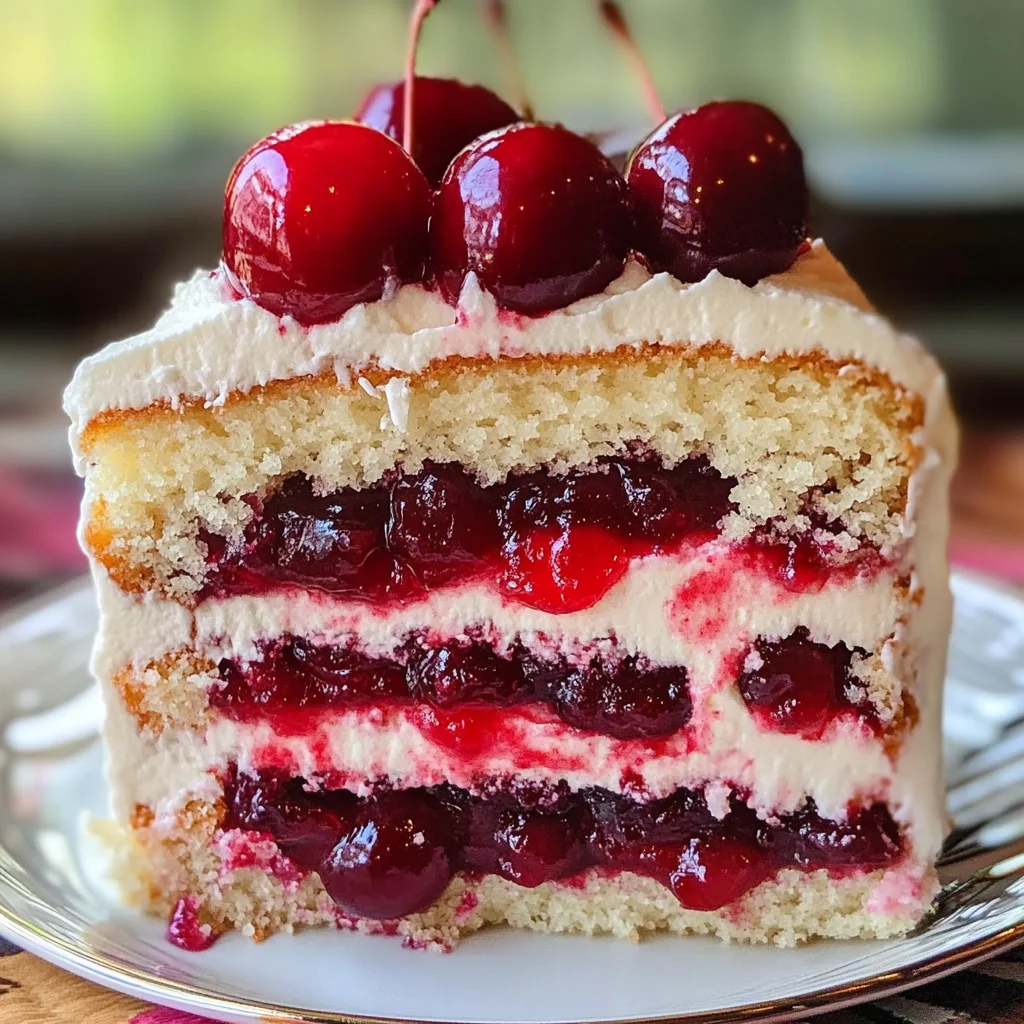
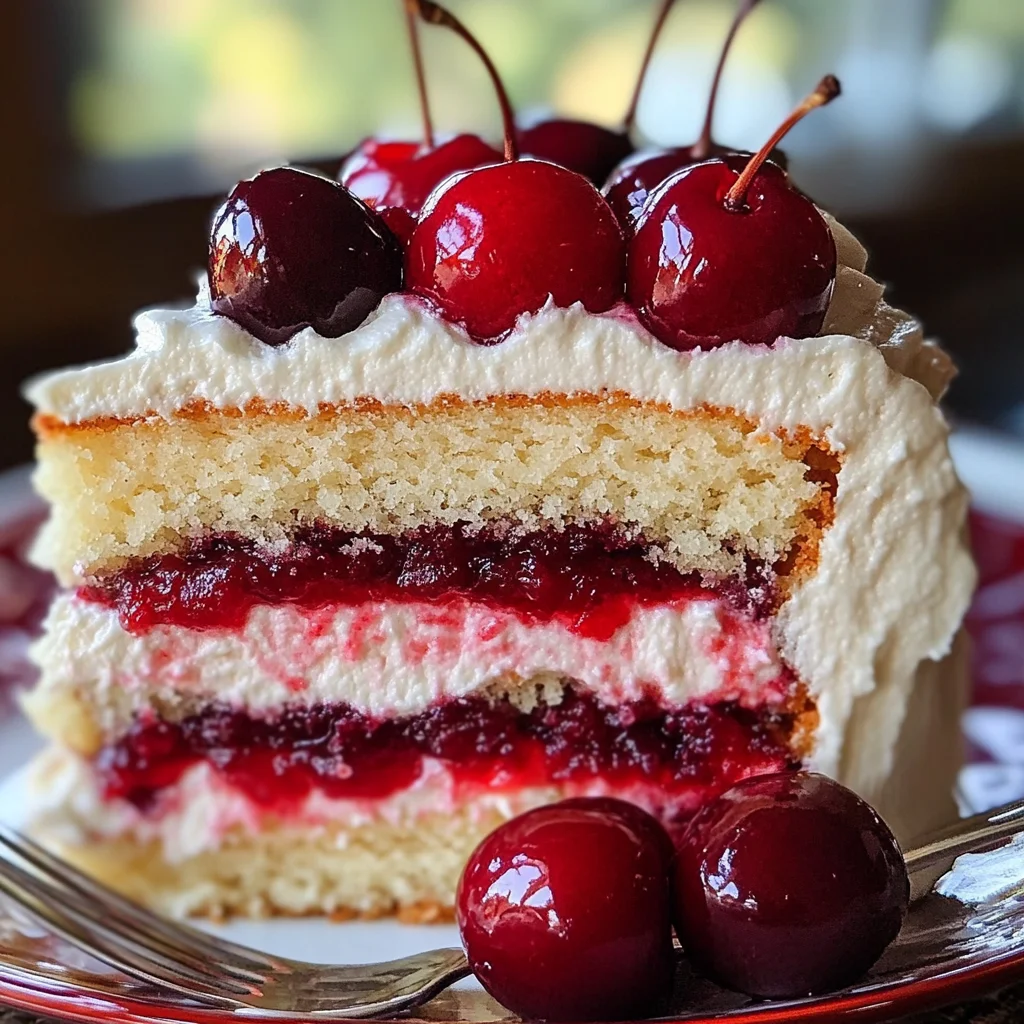
Cherry Layer Cake with Cherry Cream Cheese Frosting
If you’re looking for a dessert that not only looks stunning but also tastes divine, you’ve come to the right place! This Cherry Layer Cake with Cherry Cream Cheese Frosting is a showstopper. It’s one of those recipes that brings joy and smiles to every gathering, whether it’s a birthday party, family reunion, or just a cozy dinner at home. The combination of fluffy vanilla cake and luscious cherry cream cheese frosting makes each bite an experience worth savoring.
What I love most about this cake is its versatility. You can whip it up for a busy weeknight treat or make it the star of your weekend celebrations. Trust me; once you try this recipe, it will become a cherished favorite in your kitchen!
Why You’ll Love This Recipe
- Easy to Make: This recipe is straightforward and perfect for bakers of all skill levels!
- Flavorful Layers: The juicy cherries combined with creamy frosting create a delightful burst of flavor in every slice.
- Perfect for Any Occasion: Whether it’s a casual gathering or an elegant celebration, this cake fits right in.
- Make Ahead Option: You can bake the layers in advance and frost them later, making entertaining even easier!
- Beautiful Presentation: The vibrant colors make this cake not only delicious but also visually appealing.
Ingredients You’ll Need
Gathering simple, wholesome ingredients is half the fun! Here’s what you need to create your Cherry Layer Cake with Cherry Cream Cheese Frosting:
For the Cake
- 2½ cups all-purpose flour
- 2½ tsp baking powder
- ½ tsp salt
- 1 cup unsalted butter, softened
- 1¾ cups granulated sugar
- 4 large eggs, room temperature
- 2 tsp vanilla extract
- 1 cup whole milk (or buttermilk)
- 2 cups cherries (fresh, frozen, or canned), pitted and chopped
For the Frosting
- 8 oz cream cheese, softened
- ½ cup unsalted butter, softened
- 3½ cups powdered sugar
- 1 tsp vanilla extract
- ¼ cup cherry juice or puréed cherries (optional for flavor and color)
Variations
The beauty of this Cherry Layer Cake lies in its flexibility. Feel free to get creative with these fun variations:
- Add Nuts: Chopped walnuts or pecans can add a lovely crunch to your cake layers.
- Try Different Fruits: Substitute cherries with fresh strawberries or blueberries for a different flavor profile.
- Make It Chocolatey: Add cocoa powder into the batter for a chocolate-cherry twist!
- Use Different Frosting: Swap out the cherry cream cheese frosting with whipped cream or chocolate ganache for another delicious option.
How to Make Cherry Layer Cake with Cherry Cream Cheese Frosting
Step 1: Preheat Your Oven
Start by preheating your oven to 350°F (175°C). Greasing and lining your three 8-inch round cake pans with parchment paper ensures that the cakes come out easily without sticking.
Step 2: Mix the Dry Ingredients
In a medium bowl, whisk together the flour, baking powder, and salt. This step is crucial because it helps evenly distribute the leavening agent throughout the flour.
Step 3: Cream Butter and Sugar
In a large bowl, cream together the softened butter and granulated sugar until light and fluffy—about 3–5 minutes. This process incorporates air into the mixture, giving your cake those lovely light layers.
Step 4: Add Eggs and Vanilla
Add eggs one at a time, mixing well after each addition. Then stir in the vanilla extract. This will give your batter flavor while ensuring everything is well combined.
Step 5: Combine Dry Ingredients and Milk
Gradually alternate adding the flour mixture and milk to your batter, starting and ending with flour. Mixing until just combined prevents overworking the gluten in the flour which could lead to dense cakes.
Step 6: Bake Your Cakes
Divide your batter evenly among the prepared pans. Bake for 22–27 minutes until golden brown and a toothpick inserted comes out clean. Baking times can vary slightly based on your oven—keep an eye on them!
Step 7: Cool Down
Let your cakes cool in their pans for about 10 minutes before transferring them to wire racks to cool completely. Allowing them to cool properly ensures they are easy to frost without melting your icing!
Step 8: Prepare Cherry Filling
For that delicious cherry filling, simmer chopped cherries with 1-2 tablespoons of sugar and optionally add a splash of lemon juice until slightly thickened. Allow this mixture to cool completely before using it between layers.
Step 9: Make Your Frosting
Beat cream cheese until smooth; then add softened butter and beat until fluffy. Gradually mix in powdered sugar along with vanilla extract. If you’re feeling adventurous, add cherry juice or purée for extra flavor!
Step 10: Assemble Your Masterpiece
Now comes the fun part! Layer your cooled cakes by spreading frosting and cherry filling between each layer. Once assembled, frost the top and sides with any remaining frosting. You can garnish with fresh cherries if you want an extra touch of elegance!
And there you have it—a stunning Cherry Layer Cake with Cherry Cream Cheese Frosting perfect for sharing—and enjoying—all year round!
Pro Tips for Making Cherry Layer Cake with Cherry Cream Cheese Frosting
Creating this delightful Cherry Layer Cake is a breeze, especially with a few helpful tips to ensure it turns out perfectly every time.
-
Use room temperature ingredients: Bringing your eggs and butter to room temperature helps create a smoother batter, resulting in a lighter and fluffier cake.
-
Don’t overmix the batter: Mixing just until combined is key to a tender cake. Overmixing can lead to a dense texture that we want to avoid.
-
Cool cakes completely before frosting: Ensuring your cakes are completely cool prevents the frosting from melting and sliding off, leading to a more beautiful presentation.
-
Adjust sweetness to taste: If you prefer a less sweet frosting, feel free to modify the amount of powdered sugar. The cherry juice or purée can also add natural sweetness and flavor.
-
Experiment with different cherry varieties: Using fresh, frozen, or canned cherries can give you various flavor profiles. Each choice will contribute its unique taste and texture!
How to Serve Cherry Layer Cake with Cherry Cream Cheese Frosting
Presentation is everything when it comes to dessert! Here are some creative ways to serve your beautiful Cherry Layer Cake that will impress your guests and make every slice irresistible.
Garnishes
- Fresh cherries: Topping each slice with whole or halved fresh cherries adds visual appeal and enhances the cherry flavor.
- Whipped cream: A dollop of dairy-free whipped cream on the side provides a light contrast to the rich cream cheese frosting.
- Chocolate shavings: Sprinkling chocolate shavings on top creates an elegant touch and complements the flavors wonderfully.
Side Dishes
- Vanilla ice cream: A scoop of creamy vanilla ice cream next to your cake adds a delightful cold contrast that complements the sweetness of the cake.
- Fruit salad: A refreshing fruit salad made with seasonal fruits balances the richness of the cake, providing a light and healthy side.
- Coffee or tea: Serving slices of cake with freshly brewed coffee or aromatic tea enhances the overall experience, making it perfect for afternoon gatherings.
- Cheese platter: A small cheese platter featuring mild cheeses can provide an interesting flavor contrast, making for an elevated dessert experience.
With these serving ideas and pro tips, your Cherry Layer Cake with Cherry Cream Cheese Frosting will not only taste phenomenal but also look stunning on any table! Enjoy baking and sharing this delightful treat with friends and family!
Make Ahead and Storage
This Cherry Layer Cake with Cherry Cream Cheese Frosting is perfect for meal prep and can easily be made in advance for any occasion. Whether you want to enjoy it later or prepare for a gathering, here are some tips on how to store and maintain its deliciousness.
Storing Leftovers
- Allow the cake to cool completely before storing.
- Keep leftover slices in an airtight container in the fridge for up to 3 days.
- For longer freshness, store the cake without frosting; frost just before serving.
Freezing
- Wrap each layer of the cooled cake tightly in plastic wrap, then place them in a freezer-safe bag or container.
- You can freeze the frosted cake as well; just ensure it’s well-wrapped to prevent freezer burn.
- The cake can be frozen for up to 3 months.
Reheating
- If frozen, allow the cake layers to thaw overnight in the refrigerator before serving.
- For a warm treat, place individual slices in the microwave for about 15-20 seconds, or until just warmed through.
- Frost after reheating if you’re using a plain layer that’s been stored without frosting.
FAQs
Have questions? We’ve got answers! Here are some common inquiries about making this delightful dessert.
Can I use other fruits instead of cherries for this layer cake?
Absolutely! While this recipe features cherries, you can substitute with other fruits like raspberries or strawberries. Just adjust the sugar based on their sweetness.
How do I make Cherry Layer Cake with Cherry Cream Cheese Frosting gluten-free?
To make this Cherry Layer Cake gluten-free, simply replace all-purpose flour with a gluten-free flour blend. Ensure other ingredients are also certified gluten-free.
Can I make the frosting without cream cheese?
Yes! If you’re looking for a lighter alternative, consider using whipped coconut cream or a dairy-free cream cheese substitute to achieve a similar texture.
How long does the Cherry Layer Cake stay fresh?
The cake remains fresh for up to three days when stored properly in the refrigerator. For longer storage, freeze it as mentioned earlier!
Final Thoughts
I hope you find joy in making this Cherry Layer Cake with Cherry Cream Cheese Frosting! It’s not only visually stunning but also bursting with flavors that will delight your family and friends. Enjoy every bite and feel free to share your experience—I’d love to hear how your creation turned out. Happy baking!
Cherry Layer Cake with Cherry Cream Cheese Frosting
Indulge in the delightful experience of creating a Cherry Layer Cake with Cherry Cream Cheese Frosting—a stunning dessert that combines fluffy vanilla cake with rich, creamy frosting infused with cherries. This cake is perfect for any occasion, from birthday parties to casual family dinners. Its vibrant colors and delicious flavors will impress your guests and make any gathering feel special. With simple steps and versatile variations, this recipe is easy to master and can become a cherished favorite in your kitchen.
- Prep Time: 30 minutes
- Cook Time: 25 minutes
- Total Time: 55 minutes
- Yield: Serves approximately 12 1x
- Category: Dessert
- Method: Baking
- Cuisine: American
Ingredients
- 2½ cups all-purpose flour
- 2½ tsp baking powder
- ½ tsp salt
- 1 cup unsalted butter, softened
- 1¾ cups granulated sugar
- 4 large eggs, room temperature
- 2 tsp vanilla extract
- 1 cup whole milk
- 2 cups cherries, pitted and chopped
- 8 oz cream cheese, softened
- ½ cup unsalted butter, softened
- 3½ cups powdered sugar
- ¼ cup cherry juice or puréed cherries (optional for flavor and color)
Instructions
- Preheat oven to 350°F (175°C) and prepare three 8-inch round cake pans.
- In a bowl, whisk together flour, baking powder, and salt.
- In a large bowl, cream butter and sugar until light and fluffy. Add eggs one at a time, then mix in vanilla.
- Gradually alternate adding the flour mixture and milk until combined.
- Divide batter between pans and bake for 22–27 minutes or until golden brown. Cool in pans for 10 minutes before transferring to wire racks.
- For the frosting, beat cream cheese until smooth, add softened butter, then gradually mix in powdered sugar and optional cherry juice.
- Assemble by layering cakes with frosting and cherry filling between each layer.
Nutrition
- Serving Size: 1 slice (100g)
- Calories: 360
- Sugar: 38g
- Sodium: 210mg
- Fat: 16g
- Saturated Fat: 10g
- Unsaturated Fat: 5g
- Trans Fat: 0g
- Carbohydrates: 50g
- Fiber: 1g
- Protein: 4g
- Cholesterol: 70mg